Winter Park (Mountain Bike Capital USA) is recognized as one of the top destinations for mountain biking in Colorado, with more than 600 miles of bike trails and two major downhill bike parks.
If you haven’t tried mountain biking before, Winter Park is the perfect place to give it a go.
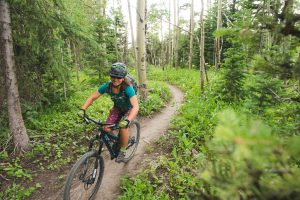
There’s a great selection of novice and family friendly trail options, and although it may seem a little intimidating at first, a day or two of cruising through flower filled meadows, playing peek-a-boo with deer and moose in the woods, and taking in breathtaking views from the top of a climb and we’re pretty sure you’ll be hooked for life.
To help you on the journey, we’ve put together a series of blogs that will answer many of the questions commonly asked by beginner mountain bikers. We’ll cover the basics of gear (what to bring/wear), beginner riding skills and our top trail recommendations for beginner and intermediate mountain bikers in Winter Park, Colorado.
Mountain Biking Basics Part 1: Gear Up
Like most sports, having the right equipment will help you feel confident and comfortable. If you’re just starting out, renting a full-suspension mountain bike won’t break the bank and will give you some extra confidence while you’re learning to tackle the trails.
For all other beginner mountain bike items, we recommend investing in the following gear.

Helmet – a good entry level bike helmet will set you back about $50 and is one of the most valuable pieces of equipment you’ll every buy – most mountain bikers that have taken a tumble or two would heartily agree. For cross-country mountain biking in Winter Park, I like helmets with plenty of ventilation (hot head!) and a peaked visor to help on all those sunny riding days.
If you are a first time biker and renting your gear, most bike rental stores will also rent helmets – take a little time to pick one out that fits you well.
Gloves – Mountain biking can be a very aerobic sport, so your paws can get a little sweaty at times! Buying a pair of light mountain bike gloves will help you keep a good grip on the handle bars when things get technical.
Sunglasses – A snug fitting pair of sunglasses will stop your eyes from watering while you zoom down the trails and protect them from dust, bugs, tree branches and other items that don’t belong in your orbitals.
Shoes – Your choice of bike shoes will depend largely on our pedal choice – flat or clipless. Flat pedals are a simple platform pedal that can be ridden with normal tennis shoes and does not physically connect your foot to the bike. Many intermediate/advanced cross-country mountain bikers progress to using special clipless pedals that require bike shoes with cleats. This type of pedal & shoe combo provides the rider with more control of their pedal strokes, but does take a little bit of getting used to. If you are trying out clipless pedals for the first time, set them to a loose release setting and practice getting in and out of them in a flat, safe area before you hit the trails.
Shorts & Shirt – There are endless choices for mountain bike clothing on the market today, from superlight Lycra wear, to padded protective wear. Whatever style you choose to wear, wicking and quick dry materials will provide you with the most comfortable ride on the trail.
What’s In Your Pack?
It’s advisable to always take a back pack mountain biking, to carry along some essential items that could potentially make or break your day. CamelBak hydration systems are a great way to combine your water needs (with a removable bladder) and carrying needs in one package, but if you don’t already have one, any waist/chest fastening back pack will do.

Water – Hydration is key in high elevations such as Winter Park, and you will want to carry lots of water with you on your mountain bike ride. If you want to flavor up your H2O, add some electrolyte powders to your bottle for maximum effect.
Snacks – A little energy boost is never a bad thing on the trail. To cut down on bulk, I’m a fan of Shot Blocks, granola bars or even a good old PB&J.
Rain coat – The weather in the mountains can change incredibly quickly. Be prepared for all conditions by bringing extra layers and a waterproof with you.
Spare inner tube – If you get a flat, the quickest way to get back on the trail is to have a spare inner tube with you, so that you can quickly switch it out for the damaged one.
Patch kit – This would be Plan C in the event that your spare inner tube also gets a flat!
Bicycle Pump – Got to have a pump if you want to fix a flat.
Bike Tool – You’ll need this to change a tire, adjust seats, and tighten up any loose bolts on your bike. They are readily available from all good bike shops and retail from $15 – $70.
First Aid Kit – It’s always worth having the essentials with you in any outdoor activity, mountain bike riding is definitely not an exception. I try to always carry a triangle bandage, assorted band aids, iodine/antiseptic wipes and some safety pins whenever I’m hitting the trails.
Trail Map – Mountain bike trails have a tendency to offer a spider’s web of options that can quickly leave you further from home than you had intended. Always know where you are and be aware of alternative routes home in case you get caught in some weather or a thunder storm.
Chain Lube – Perhaps not a necessity, but having a well lubed chain can really help to keep those wheels spinning nicely.
So now that you’ve got all your gear in order, it’s time to start working on those biking skills. Tune in next week for Mountain Biking Basics Part 2: Beginner Rider Skills.